Input nodes are used to define what data will be included in your selection. This will be the raw data to feed your Selection, and can come from a number of sources, either through your Data or from Campaign interaction and History.
Query Element
The first node to look at is a Query Element node. This will allow you to pull data from your database into a selection. This data can be composed from any data-set in your system. By Selecting (Highlighted in Red) the Query option, you can click and drag it into your workspace.
In the properties pane, you have several configuration options:
- Name - Where you can change the name of your Element.
- Table - The database table your query will be calculated at. This will need to be changed depending on what level of data your selection looks at. For example, if you wanted to select your Customers/Individuals within your database with a Gender of "Male", this would need to be set to "Individuals"
- Query - Where you will build the query for this node. To edit this, click on the Orange Pencil to begin editing this query in the Query Window. As with other Query windows, to populate this window you can either:
- Free-type in this box to write your query.
- Click and drag from your BlueVenn Search Bar to search for fields / data-sets to drop into this window.
- Select a Field from your Database and drag this into the Campaign Window.
Campaign Element
The Campaign Element allows you to pull Individuals based on their campaign journey history within your BlueVenn system. With this tool you can pull data based on where an individual may currently sit within an existing campaign, the number of times they have passed through a campaign or even if they are sat on a specific step within a campaign.
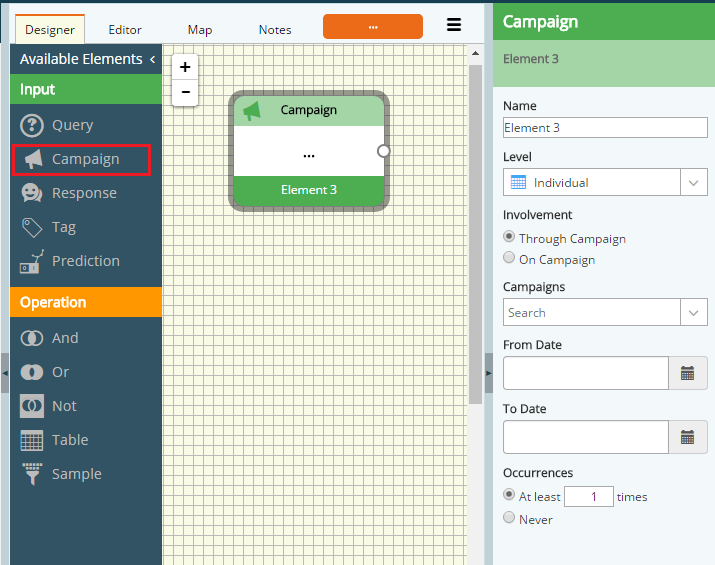
You can use the follwing options to narrow down and define what data-set you want to pull:
- Name - Assigns a name to this Campaign Selection Element
- Level - Selects the Table your node is calculating at. This will be the same Table Level which your campaigns run at. In this instance on the Individual Table.
- Involvement
- Through Campaign - This selects people who have completed the Exit step of your selected campaign. If an individual is currently present within a campaign (e.g. on a Wait node), they won't be selected.
- On Campaign - This option selects people if they are currently waiting on your defined campaign. If this is selected, you will be given an additional option to select a specific Step they may be waiting on if required.
- Campaigns - Using the drop-down, use this to select the campaign you would like to pull history data from.
- From/To Date - Using this can narrow down a time-frame you want to select from, e.g. if you wanted to pull everyone who received a specific campaign last week/month
- Occurrences
- At least <> times - Using this, you can outline how many times an individual must have cycled through a campaign (e.g. select everyone who's been sent this campaign at least 3 times)
- Never - Toggling this will select all individuals who have not gone through this campaign.
Response Element
Similar to the Campaign node, the Response node further narrows your criteria, selecting only individuals who have interacted/responded to a previous campaign.
Whilst all the functionality for this node is the same as the Campaign node, the Response node comes with the additional function of "Response Types". Clicking on the drop-down arrow for this will then list all the possible responses and scenarios for that campaign, e.g. "Opens", "Clicks", "Unsubscribes".
These will then filter through your selection, to then segment people based on their campaign interactions.
Tag Element
Use the Tag node to select individuals based on their tagging history. Tags are a feature used in campaigns, which based on an individual's behaviour within a campaign, can be tagged with certain attributes. For example, if an individual has fed through a full campaign Journey but has not opened any of the campaigns sent, they may then be tagged as "Inactive".
Alternatively, if a campaign was sent to anyone with a Tag of "Inactive" and they then engaged, they could then be assigned a new tag of "Re-Engaged".
Tags can be useful for combining data sets with other criteria, e.g. to select all "Happy Customers" who also live within 10 miles of a store, to promote a local promotional campaign.
Prediction Element
The Prediction modeling node will take an existing model built within the modeler tool. This Selection node pulls any records based on their prediction scores from that model.
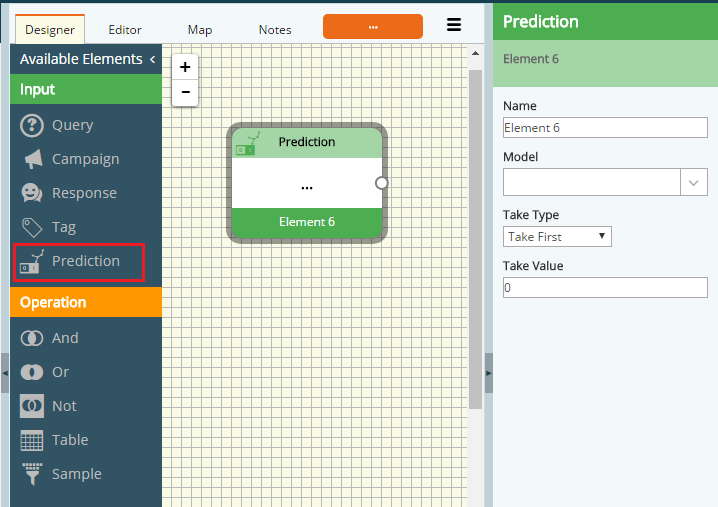
To use this, first select the model you wish to base your selection on using the drop-down under Model.
Once this is selected, you can define what data to select, using Take Type. By default, it will be set to "Take First", but you have options to take records based on any scoring mechanic. For example, "Take Over" selects all records with a prediction score over your assigned value. This is assigned by putting a data score in the Take Value section.
Once your settings have been selected, it runs through the Prediction model, and selects all Individuals whose score for that model fits your outlined rules.
Geographic element
Geographic querying allows you to build selections based on geographic data, providing a list of matching records based on a distance from a single point of origin, e.g. to create an invite list for an event situated at one of the business' properties.
-
Open a New Selection and drag out a Geographic Node
-
In the Geographic Node properties pane, enter the Geographic Origin (zip/postcode), Distance, and Unit (miles, km or meters).
-
Refresh the Selection and adjust until the desired audience number is reached.
-
Right-click on the orange count and choose New Campaign Audience to start a new campaign with this selection as the audience.
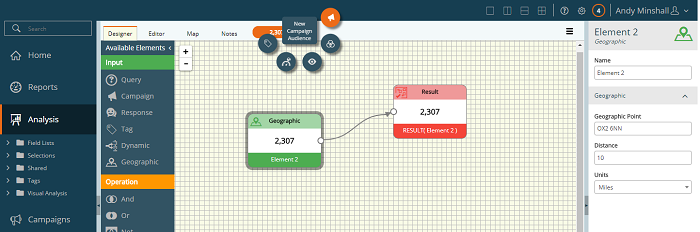
If needed, the query syntax can be edited using the Editor tab. The syntax usage is as follows:
Table( ( GEOSELECTION ( Decimal Latitude, Decimal Longtitude, Integer Radius ) ), [Table Level] )
-
( GEOSELECTION ( Decimal Latitude, Decimal Longtitude, Integer Radius ) ) - selects records from the geographic table (eg: Address) matching the postcode/zip code of the origin against internal Latitude, Longtitude and Radius look up sources.
-
Table ( Expression , Tablename ) - takes the selection to the defined level, e.g. [Individual] would use the Individual table to retrieve the Individuals associated with the Addresses at those co-ordinates.